Setting a formal table for dinner is more than just arranging utensils and dishes—it’s a ritual that reflects elegance, sophistication, and respect for your guests.
Whether you’re hosting a lavish dinner party or a formal family gathering, knowing how to setting a formal table is essential. Having this knowledge will help you at any formal dinner party you attend as well!
In this comprehensive guide, we’ll delve into the intricacies of formal dinner settings, highlighting the golden rule of utensil placement and addressing common mistakes that can detract from the overall ambiance. Let’s embark on a journey to master the art of setting a formal dinner table.
Golden Rule
In the world of formal dining etiquette, the golden rule reigns supreme: utensils are placed in order of use, from the outside in.
This fundamental principle ensures a seamless dining experience for your guests, allowing them to navigate through the meal with ease. Imagine each utensil as a chapter in a culinary story, progressing logically from appetizers to main course and dessert. By adhering to this rule, you demonstrate your commitment to hospitality and refinement.
Common Mistakes
Despite being a simple task, setting a formal table can be fraught with pitfalls. Let’s explore some of the most common mistakes that can detract from the overall elegance of your dining experience:
Utensils Not Placed Properly: Misaligned forks, misplaced knives, and haphazardly arranged spoons can disrupt the visual harmony of your table setting. Use our guide (below) to help you with each course; Dinner, Salad, Fish, Main Course and Dessert. Take care to arrange each utensil with precision, ensuring they are evenly spaced and aligned.
Fragrant Flowers and Candles: While floral arrangements and candles can enhance the ambiance of your table, choose them wisely. Avoid highly fragrant flowers that may overpower the aroma of your meal, and opt for unscented candles.
Incorrect Size Tablecloth: Using the proper sized tablecloth is the essential canvas to your table. Proper size, ironed, clean and draped to the floor if necessary. A tablecloth that is too short or too long can detract from the overall aesthetic of your table setting. Use a square tablecloth on a square table, oblong on an oblong and round on a round table. To give your table a layering effect, place a small square tablecloth in the center of a round table or a subtle colored runner on an oblong or square table.
Distracting Centerpiece: While a striking centerpiece can serve as the focal point of your table, exercise restraint to avoid overwhelming your guests. Opt for low-profile arrangements that allow for easy conversation and unobstructed views across the table.
Overcrowding with Too Many Dishes: While variety is the spice of life, overcrowding your table with an excess of dishes can create confusion and clutter. You don’t want to overwhelm your guest. Serve proper tableware when changing courses. For example, only have a salad plate on the table when serving salad. After everyone is finished, add the dinner plate or a fish plate, main course and dessert plate when appropriate.
Lack of Table Protection: Protect your table from heat, spills, and scratches with the appropriate tableware, such as placemats, coasters, and trivets. Not only do these accessories safeguard your table’s surface, but they also add an extra layer of elegance to your setting.
Basic Table Setting
Photo Courtesy of Karen Sewell
Step-by-Step to Setting A Formal Table
Start with a clean, well-ironed tablecloth that drapes evenly over the table. A neutral color is best here. Add color with faux flowers or napkins.
Place a charger or service plate at each setting, serving as a decorative base for the dinnerware.
Arrange the dinner plate in the center of each charger, ensuring it is aligned with the table’s edge.
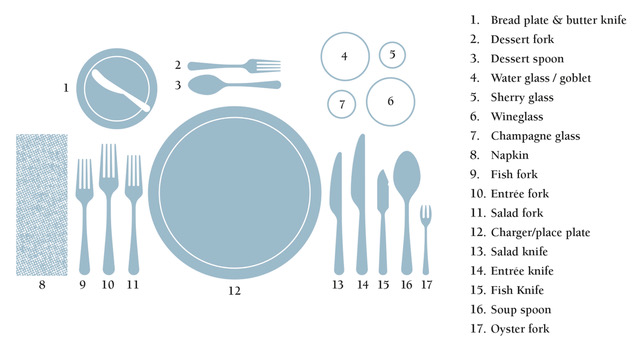
Position the forks to the left of the plate, with the salad fork placed on the outermost side and the dinner fork closest to the plate.
Place the knife to the right of the plate, with the blade facing inward.
Position the spoons to the right of the knife, with the soup spoon placed on the outermost side and the dessert spoon closest to the plate.
Place the water glass above the knife, slightly to the right.
Position the white wine glass to the right of the water glass, followed by the red wine glass.
Finally, place the bread plate above the forks, with the butter knife resting diagonally across it.
Glass and Bread Placement
The placement of glassware and bread plate is an essential aspect of formal table setting, adding both aesthetic appeal and functionality to your arrangement:
Water Glass Placement: The water glass is traditionally placed directly above the knife, slightly to the right. Its central position ensures easy access for guests throughout the meal.
White Wine and Red Wine Glass Placement: The wine glasses are positioned to the right of the water glass, with the white wine glass placed slightly higher than the red wine glass. This arrangement allows for seamless progression from aperitif to main course. See more on wine glasses here.
Bread Plate Placement: The bread plate is positioned above the forks, slightly to the left of the dinner plate. Its proximity to the main setting ensures easy access for guests to enjoy bread or rolls throughout the meal.
Photo Courtesy of Emily Post Etiquette. See more from Emily Post here.
Conclusion
Mastering the art of setting a formal table for dinner requires attention to detail, precision, and a deep appreciation for etiquette and aesthetics.
By adhering to the golden rule of utensil placement and avoiding common mistakes, you can create an ambiance of elegance and refinement that enhances the dining experience for you and your guests.
Whether you’re hosting a grand soirée or an intimate gathering, let your table setting reflect the warmth of your hospitality and the grace of your taste. Cheers to the art of dining in style!
This post contains affiliate links. If you use these links to buy something we may earn a commission. As an Amazon Influencer, I earn from qualifying purchases.
Table of Contents
With our kid friendly easter menu, let the fun begin. Easter is a time for joy, celebration, and delicious food, especially for kids who eagerly anticipate the festivities and the delectable treats that come with it.
Crafting a kid friendly Easter menu tailored to them can transform the holiday into a memorable culinary adventure for the whole family. From adorable Easter chick cookies to comforting mac and cheese, carrot cake bars, bunny breadsticks, and classic ham with glazed carrots, this blog will guide you through a delightful selection of recipes guaranteed to make your children’s Easter celebration extra special. Plus, we’ll add a healthy twist with some refreshing carrot juice to balance out the sweetness and add a burst of nutrition to the menu. Get ready to dive into a fun and delicious kid friendly Easter menuthat will have your kids hopping with delight!
Easter Chick and Egg Cookies
Easter Chick Cookies: What better way to kick off your Easter menu than with adorable Easter chick cookies? These sweet treats are not only fun to make but also irresistibly cute and tasty. Gather your little helpers and start by preparing a simple sugar cookie dough. Roll out the dough and use oval or chick shaped cookie cutters to cut out your cookies.
After baking and cooling, it’s time to let your creativity shine! Decorate the cookies with yellow icing, candy eyes, and orange candy beaks to bring these little chicks to life. Get creative with different expressions and decorations to make each chick unique. These cookies will surely bring smiles to your kids’ faces and add a festive touch to your Easter spread.
Mac and Cheese
Mac and Cheese: No kid’s Easter menu is complete without a comforting bowl of creamy mac and cheese. This classic dish is loved by children and adults alike, making it a perfect addition to your Easter feast. Whip up a homemade cheese sauce using a blend of cheddar and mozzarella cheese for extra creaminess. Toss in cooked macaroni and bake until golden and bubbly. For added fun, consider using Easter-themed pasta shapes like bunnies or eggs to give the dish a festive twist. Serve this cheesy delight alongside other Easter favorites for a meal that’s sure to be a hit with the little ones.
Carrot Cake Bars: Easter wouldn’t be complete without a delicious dessert, and these carrot cake bars are a crowd-pleaser that kids will love. Moist and flavorful, these bars are packed with shredded carrots, warm spices, and topped with a luscious cream cheese frosting. The best part? These bars are easy to make and perfect for little hands to enjoy. Simply mix together the batter, spread it into a baking pan, and bake until golden brown. Once cooled, slather on the cream cheese frosting and cut into bars for a treat that’s both indulgent and festive. These carrot cake bars are sure to become a new Easter tradition in your household.
Bunny Breadsticks: Add a whimsical touch to your Easter menu with bunny breadsticks that are as fun to make as they are to eat. Start with store-bought pizza dough or homemade dough if you prefer. Roll out the dough into long ropes and shape them into bunny ears, bodies, and tails. Arrange the pieces on a baking sheet, leaving space between each bunny, and bake until golden brown. Once cooled, serve these adorable breadsticks alongside dips like marinara sauce or creamy cheese dip for extra flavor. These bunny breadsticks are not only delicious but also make for a cute Easter-themed appetizer or side dish that will delight kids of all ages.
Ham and Glazed Carrots: For the main course of your kid friendly Easter menu, serve up a classic ham with glazed carrots that will satisfy even the pickiest of eaters. A spiral-cut ham glazed with a sweet and tangy sauce is a timeless Easter tradition that never fails to impress. Pair it with glazed carrots cooked until tender and caramelized for a side dish that perfectly complements the savory ham. The combination of juicy ham and sweet carrots is sure to be a hit with kids and adults alike. Plus, the leftovers make for delicious sandwiches and snacks in the days following Easter.
Lastly, in our kid friendly easter menu is Refreshing Carrot Juice: To balance out the sweetness of the Easter treats and add a healthy element to the menu, why not include some refreshing carrot juice? Carrots are packed with vitamins and antioxidants, making them a nutritious addition to any meal. Simply juice fresh carrots in a juicer or blender, and serve chilled with ice cubes. You can also add a splash of orange juice or a sprinkle of cinnamon for extra flavor. Not only is carrot juice delicious, but it’s also a fun way to sneak in some extra nutrients for your little ones. Serve it alongside the Easter feast for a refreshing and healthy beverage option.
Creating a Kid friendly Easter menu for kids is a wonderful way to make the holiday even more magical and memorable. From adorable Easter chick cookies to comforting mac and cheese, carrot cake bars, bunny breadsticks, classic ham with glazed carrots, and refreshing carrot juice, these recipes and ideas are sure to delight children of all ages. So gather your little ones, roll up your sleeves, and get ready to embark on a delicious Easter culinary adventure that will have the whole family hopping with joy!
Tackling Baseboards, Door Panels, Ceiling Fan Blades, and Curtain Tops
Cleaning Hack Secrets
Cleaning hack secrets. Do you feel like it’s a never-ending battle against the relentless accumulation of particles on surfaces throughout our homes.
From baseboards to door panels, ceiling fan blades to the tops of curtains, dust seems to settle everywhere, leaving our living spaces looking dull and neglected. But fear not!
Cleaning hack secrets is a broad category. We will focus on dusting different areas in this blog. With the right strategies and a bit of elbow grease, you can conquer dust and maintain a clean and inviting home environment.
In this comprehensive guide, we’ll explore effective techniques for dusting those often-overlooked areas and share tips for staying on top of the dusting game.
Understanding the Enemy: What is Dust?
Before we dive into dusting tactics, let’s take a moment to understand what exactly dust is and why it seems to appear everywhere.
Dust is composed of tiny particles that originate from various sources, including dirt, pollen, dead skin cells, pet dander, and fibers from fabrics and textiles.
These particles become airborne and settle on surfaces throughout our homes, creating the familiar layer of dust that we love to hate.
Identifying Dust Hotspots: Baseboards, Door Panels, Ceiling Fan Blades, and Curtain Tops
While dust can accumulate on virtually any surface, some areas of our homes are particularly prone to collecting dust. Let’s shine a spotlight on four common dust hotspots:
Baseboards: The narrow strip of molding that runs along the bottom of walls, baseboards are notorious for trapping dust and dirt. Their low position makes them susceptible to collecting dust kicked up from the floor, as well as pet hair and other debris.
Door Panels: Whether made of wood, metal, or another material, door panels are magnets for dust and fingerprints. Their vertical orientation makes them easy targets for airborne particles, especially in high-traffic areas of the home.
Ceiling Fan Blades: While ceiling fans help circulate air and keep rooms cool, they also accumulate dust on their blades over time. The constant rotation of the blades can fling dust particles into the air, exacerbating the dust problem in the room.
Top of Curtains: Curtain tops, especially those that gather near windows, are prone to collecting dust and lint. Their horizontal orientation makes them ideal landing spots for airborne particles, which settle on the fabric over time.
Tackling the Dust: Effective Dusting Techniques
In our blog, Cleaning hack secrets you will need a few Items for dusting include a wet microfiber cloth, vacuum cleaner with upholstery brush, and crevice tool. Avoid a wet paper towel because they are made from paper and release little particles. Avoid a feather duster as this only swishes the dust around making it become airborne.
Now that we’ve identified our dust hotspots, let’s explore some effective techniques for dusting these areas and keeping them looking fresh and clean:
Baseboards:
Start by vacuuming or sweeping the area around the baseboards to remove any loose dirt and debris.
Use a damp microfiber cloth or a soft-bristled brush to wipe down the baseboards, working from top to bottom.
For stubborn dirt or grime, apply a small amount of mild detergent or all-purpose cleaner to the cloth and gently scrub the affected areas.
Once clean, dry the baseboards thoroughly to prevent moisture damage and mold growth.
Door Panels:
Dust door panels with a dry microfiber cloth working from top to bottom to capture falling dust.
For stubborn dirt or fingerprints, dampen the cloth slightly with water or a mild cleaning solution and gently wipe the surface.
Pay special attention to crevices, corners, and decorative details on the door panels, where dust tends to accumulate. Sometimes a small paint brush works in the crevices.
Finish by drying the door panels with a clean, dry cloth to prevent streaks or water spots.
Ceiling Fan Blades:
Turn off the ceiling fan and wait for the blades to come to a complete stop before dusting.
Use a long-handled duster or a microfiber cloth attached to an extendable pole to reach the fan blades.
Wipe each blade individually, starting from the top and working your way down to capture falling dust.
For heavily soiled blades, use a mild cleaning solution diluted in water and a soft cloth to gently wipe away dirt and grime.
Once clean, allow the fan blades to dry completely before turning the fan back on.
Top of Curtains:
Carefully climb a ladder or step stool to reach the top of the curtains.
Use a handheld vacuum with a soft brush attachment to gently remove dust from the fabric.
Alternatively, wrap a microfiber cloth around the bristles of a broom or mop and use it to wipe down the curtain tops.
For delicate or intricate fabrics, consult the manufacturer’s instructions for cleaning recommendations.
Finish by vacuuming or sweeping the floor beneath the curtains to remove any dust that may have fallen during cleaning.
Staying on Top of Dust: Tips for Maintenance
We are almost done with cleaning hack secrets. Now that we’ve banished the dust from our baseboards, door panels, ceiling fan blades, and curtain tops, how can we ensure that they stay clean for longer? Here are some tips for maintaining a dust-free home:
Regular Cleaning Schedule: Incorporate dusting into your regular cleaning routine to prevent dust from accumulating and becoming more difficult to remove.
Use Air Purifiers: Invest in high-quality air purifiers to help reduce the amount of dust and other airborne particles circulating in your home.
Wash Bedding and Curtains: Wash bedding, curtains, and other fabric items regularly to remove dust, pollen, and other allergens.
Minimize Clutter: Keep surfaces clutter-free to reduce the number of hiding spots for dust and make cleaning more manageable.
Close Windows and Doors: Keep windows and doors closed during windy or dusty conditions to prevent outside dust from entering your home.
Change HVAC Filters: Replace HVAC filters regularly to prevent dust and other particles from circulating throughout your home.
Consider Professional Cleaning: For deep cleaning and maintenance of hard-to-reach areas, consider hiring professional cleaners who have the tools and expertise to get the job done effectively.
We have taken cleaning hack secrets and broke it down into smaller pieces focusing on dust. We don’t want to feel overwhelmed if we have to clean. Right! Dusting may be a never-ending chore, but armed with the right techniques and strategies, you can keep your home looking fresh and clean year-round.
By targeting dust hotspots such as baseboards, door panels, ceiling fan blades, and curtain tops and incorporating regular maintenance into your cleaning routine, you can banish dust and create a healthier and more inviting living environment for you and your family.
So, roll up your sleeves, grab your duster, and let’s dust away those dusting woes once and for all!
Creating a beautiful tablescape is an art that turns ordinary gatherings into memorable events. Whether you’re a home entertainer, a DIY enthusiast, or an event planner, the magic of a well-designed table setting can captivate your guests and set the tone for a fabulous party. Exploring Christinas Tabletop With some imagination and a few practical tips, you can design tabletop decorations that impress your guests while expressing your personal style. No matter the occasion—a simple dinner...
Refreshing way to Toast the Seasons arrival Spring cocktails offer a refreshing and invigorating way to toast to the season’s arrival, whether you’re craving a non-alcoholic sipper or a spirited libation. Embrace the essence of spring with vibrant concoctions like the Strawberry Basil Spritzer, blending muddled strawberries, basil leaves, and sparkling water for a burst… Read more: Spring Cocktails
A Guide to Elegance and Etiquette How to set up dinner table for a formal dinner Setting a formal table for dinner is more than just arranging utensils and dishes—it’s a ritual that reflects elegance, sophistication, and respect for your guests. Whether you’re hosting a lavish dinner party or a formal family gathering, knowing how… Read more: How to set up dinner table for a formal dinner
Beautiful Tablescapes - Create Memorable Gatherings Creating a beautiful tablescape is an art that turns ordinary gatherings into memorable events. Whether you’re a home entertainer, a DIY enthusiast, or an event planner, the magic of a well-designed table setting can captivate your guests and set the tone for a fabulous party. With some imagination and a few practical tips, you can design tabletop decorations that impress your guests while expressing your personal style. No matter the...
How to design a Beautiful Tablescape Creating a beautiful tablescape is an art that turns ordinary gatherings into memorable events. Whether you’re a home entertainer, a DIY enthusiast, or an event planner, the magic of a well-designed table setting can captivate your guests and set the tone for a fabulous party. With some imagination and… Read more: Beautiful Tablescapes – Create Memorable Gatherings
Recent Comments
No comments to show.
We use cookies to ensure that we give you the best experience on our website. If you continue to use this site we will assume that you are happy with it.Ok